This is a short tutorial on how to get started with auto scaling on AWS. I created this tutorial after some personal research into scaling a Spring Boot application. It will get you up and running with a load balancer and a variable number of servers, scaling up based on the number of requests your service receives. The beauty of AWS is you pay for what you use, so being able to scale out and back in means you are ready for large amounts of traffic, but you are also not overpaying for idle servers. This guide goes through how to set this up.
Jargon
We will be setting up the following components:
Application Load Balancer (Approximately $0.025 per hour depending on region)
A load balancer serves as the single point of contact for clients. The load balancer distributes incoming application traffic across multiple targets, such as EC2 instances, in multiple Availability Zones. This increases the availability of your application and allows you to add additional servers behind the load balancer to increase the amount of traffic your service can handle.
Target Group (Free)
Each target group routes requests to one or more registered targets, such as EC2 instances, using the protocol and port number that you specify. You can register a target with multiple target groups. You can configure health checks on a per target group basis. Health checks are performed on all targets registered to a target group that is specified in a listener rule for your load balancer.
Launch Configuration (Free)
A launch configuration tells Amazon how to create new EC2 instances when scaling. That means it has all of the details necessary for creating a new server. When you create a launch configuration, you specify information for the instances such as the ID of the Amazon Machine Image (AMI), the instance type, a key pair, one or more security groups, and a block device mapping. If you’ve launched an EC2 instance before, you specified the same information in order to launch the instance.
Auto Scaling Group (Free, but you pay for any servers you start)
An Auto Scaling Group (ASG) contains a collection of EC2 instances that share similar characteristics and are treated as a logical grouping for the purposes of instance scaling and management. An ASG has scaling policies which tell it when to increase or decrease the number of instances (E.g add 1 server if average CPU usage is greater than 80%). An ASG references a launch configuration to tell it how to start new instances when required.
Security Groups (Free)
A security group acts as a virtual firewall that controls the traffic for one or more instances. When you launch an instance, you associate one or more security groups with the instance. You add rules to each security group that allow traffic to or from its associated instances.
Key Pair (Free)
A key pair allows you to remotely log in to your servers via SSH if required. You must save the private key which AWS provide and use this private key for connecting to your instance.
Launching into AWS
This is broken down in to four steps:
- Create a load balancer
- Create the launch configuration
- Create an auto scaling group (And scaling policies)
- Testing
Create a load balancer
The load balancer distributes traffic between each of your EC2 instances. To set it up, log in to your AWS console and go to the EC2 service, then:
- Click “Load Balancers” in the navigation.
- Click “Create Load Balancer” and select “Application Load Balancer”.
- On step 1, give your load balancer a name, e.g “ApacheLoadBalancer”.
- Within “Availability Zones”, tick all of the availability zones in your region. This allows your load balancer to distribute traffic between all of the available availability zones in your region, this is essential for resiliancy. Its always a good planto utilise multiple availability zones as it means if one data center gets flooded, or there is a fire, not all of your servers are there and your service can continue to run.
- Leave the rest as default, and press “Next: Configure Security Groups”.
- Create a new security group which allows inbound traffic on port 80. This is the port HTTP traffic uses. If you want to set up SSL and HTTPS, you should allow port 443. However, that isn’t necessary for this tutorial.
- Name your security group (e.g ApacheLoadBalancerSecurityGroup) and press “Next”.
- Create a new taget group and name it (e.g ApacheTargetGroup) and press “Next”.
- At the moment we don’t have any instances so we can’t register targets for this load balancer (yet). We will do this in the next steps. Press “Review”.
- Your review page should look like this:

You have now set up a load balancer, but it does not have any instances to route traffic to as the target group is empty. The next step is to create the launch configuration.
Create the launch configuration
The launch configuration tells AWS how to create new servers to add to your target group. It has the details about instance size (memory and vCPUs) and how to initialise the server. Follow these steps to set up a simple launch configuration for a server with Apache installed and a simple “Hello World” HTML page.
Still within the “EC2” service on AWS, Select “Launch Configurations”, then:
- Click “Create launch configuration”.
- Select “Amazon Linux AMI”
- Select the instance since you want. The t2.micros are in the free-tier usage and so I would recommend them for this tutorial. You get up to 750 hours total of free t2.micro use per month. There are about 750 hours in a month so you can use 1 server continually for free, or you could use for example 75 for 10 hours.
- Select next and give your launch configuration a name, for example “ApacheLaunchConfiguration”.
- The apache server doesn’t need an IAM role since it does not interract with AWS services, however you do need to specify some user-data, so select “Advanced”.
- The userdata script tells the server what to do when it starts up. We can specify a very simple script which installs apache and sets up a static HTML page saying “Hello World”. This can be achieved by entering the following into the userdata:
#!/bin/bash
yum update -y
yum install httpd -y
service httpd start
chkconfig httpd on

cd /var/www/html
echo "<html>" > index.html
echo "<head>" >> index.html
echo "</head>" >> index.html
echo "<body>" >> index.html
echo "<p>Hello World</p>" >> index.html
echo "</body>" >> index.html
echo "</html>" >> index.html- You may want to edit this to, for example, launch your spring boot application or clone and execute a github repository, but for this example it’s just a simple apache server.
- Press next to add storage, leave the defaults and press next to configure security groups.
- Create a new security group. Call it something like “ApacheServiceSecurityGroup”. Your EC2 instance needs to allow inbound traffic from your load balancer, so select “HTTP” for the type, port 80, and select “Custom IP”.
- Here you can type in the name of the security group you attached to the load balancer. If you followed the example, it will be “ApacheLoadBalancerSecurityGroup”.
- Select review. It will look like this:

- Proceed without a key pair, since we don’t need to remotely log in to any of the individual servers (And we shouldn’t, as any servers we create should be the same so we should not have to manually tinker with them).
Create an auto scaling group
You have now created a launch configuration which tells AWS how to create new instances. You now need to create an auto scaling group which holds policies indicating when to scale. Lets create the auto scaling group - from the review page from the launch configuration, click “Create an Auto Scaling group using this launch configuration.”
- Give it a name, e.g “ApacheAutoScalingGroup” and leave “Group Size” to 1.
- In subnets, select all of the subnets that you entered for your load balancer. This will cause the auto scaling group to create instances in the availability zones which your subnets are in.
- Select “Advanced”, and click “Recieve traffic from one or more load balancers”. Then under target groups select the “ApacheTargetGroup” you created earlier. Note that monitoring states that metrics are taken every 5 minutes. Press next.
- Select “Use scaling policies to adjust the capacity of this group”. Make sure to specify the maximum number of instances you want to scale up to. For this tutorial I entered “5”.
- Give your scaling polcy a name and select “Application Load Balancer Request Count Per Target” from the drop down. Set a target value of 5. This means AWS will try to achieve 5 requests per minute per instance. So if you are receiving 15 requests per minute, it will start 3 servers. Enter “60” for the time to warm up, although you should test this value for any production system and don’t guess.
- Press next, configure any notifications you want and press next again to configure tags.
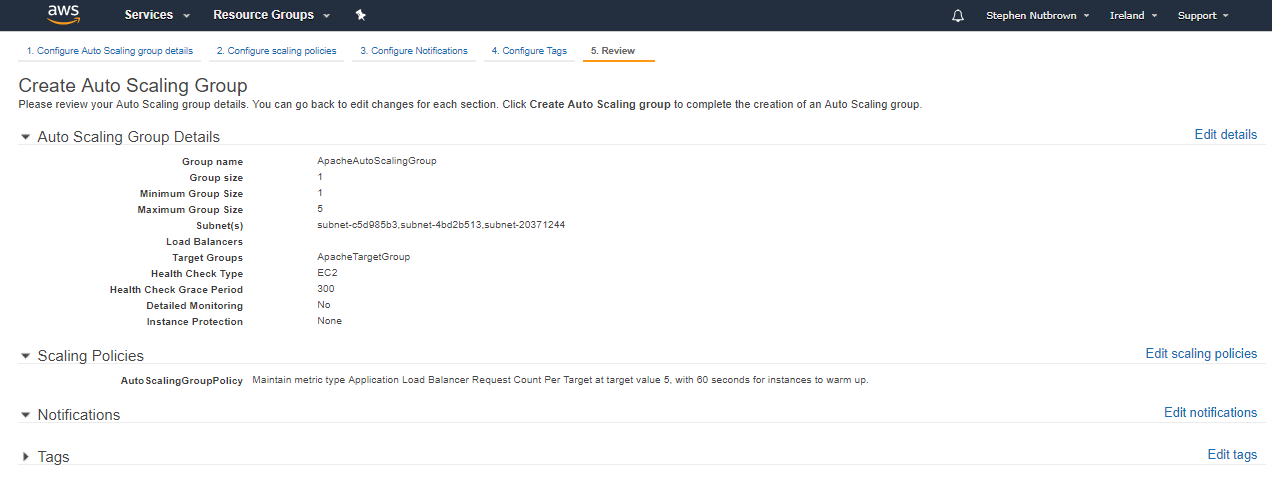
- Press “review”, it should look like this:
Testing
We can verify that everything is working by sending requests to our load balancer which will forward requests on to our one instance. If we send several requests, the auto scaling group will trigger scaling events and begin starting up new EC2s.
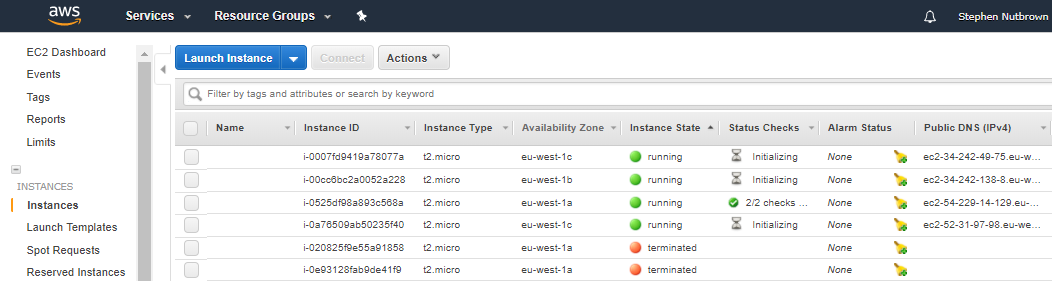
- Click on “Instances” in the left navigation of the EC2 dashboard, and verify you have 1 EC2 running.
- Click on Load Balancers and copy the DNS name for your load balancer, it should look like this: “ApacheLoadBalancer-282713871.eu-west-1.elb.amazonaws.com”.
- Enter this into your browser and you should see your page:

You can monitor the request count per target by selecting “Target Groups”, then selecting “Monitoring”.
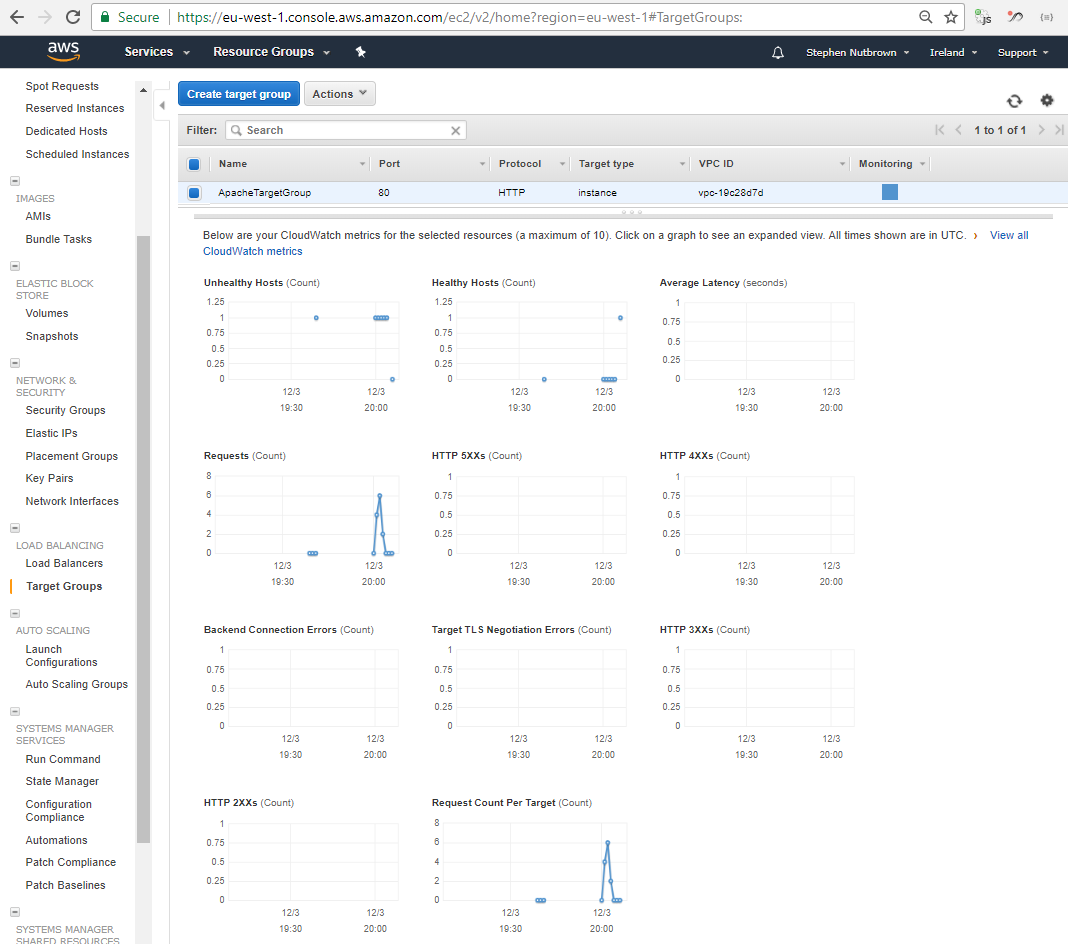
Finally, send some traffic to your instance to cause the “Request Count Per Target” to increase; then watch as EC2 instances are started in the “Instances” section. You can send a lot of traffic for free by using https://loadimpact.com/ and entering in the address of your load balancer. It may take a few minutes for servers to begin spinning up.
Clean-up
You should delete everything you have created to avoid unnecessary charges to your account. You should delete the load balancer first, then delete the auto scaling group which will in turn terminate any EC2 instances. Finally, delete the unnecessary target group, launch configuration and security groups.